
If your kitchen faucet drips, squeals, or feels gritty when you turn it, knowing how to change a kitchen tap valve is the single most useful plumbing skill you can pick up. The valve — sometimes called the cartridge, ceramic disc, or stem — is the heart of the faucet. It controls how water flows and mixes, and it is almost always the part that wears out first. The good news: you rarely need to replace the whole faucet. A new valve costs a fraction of the price and takes less than an hour to fit. This guide from the VIGA Faucet team explains every step in plain American English, so you can do the job confidently the first time.
How to Change a Kitchen Tap Valve: What the Valve Actually Does
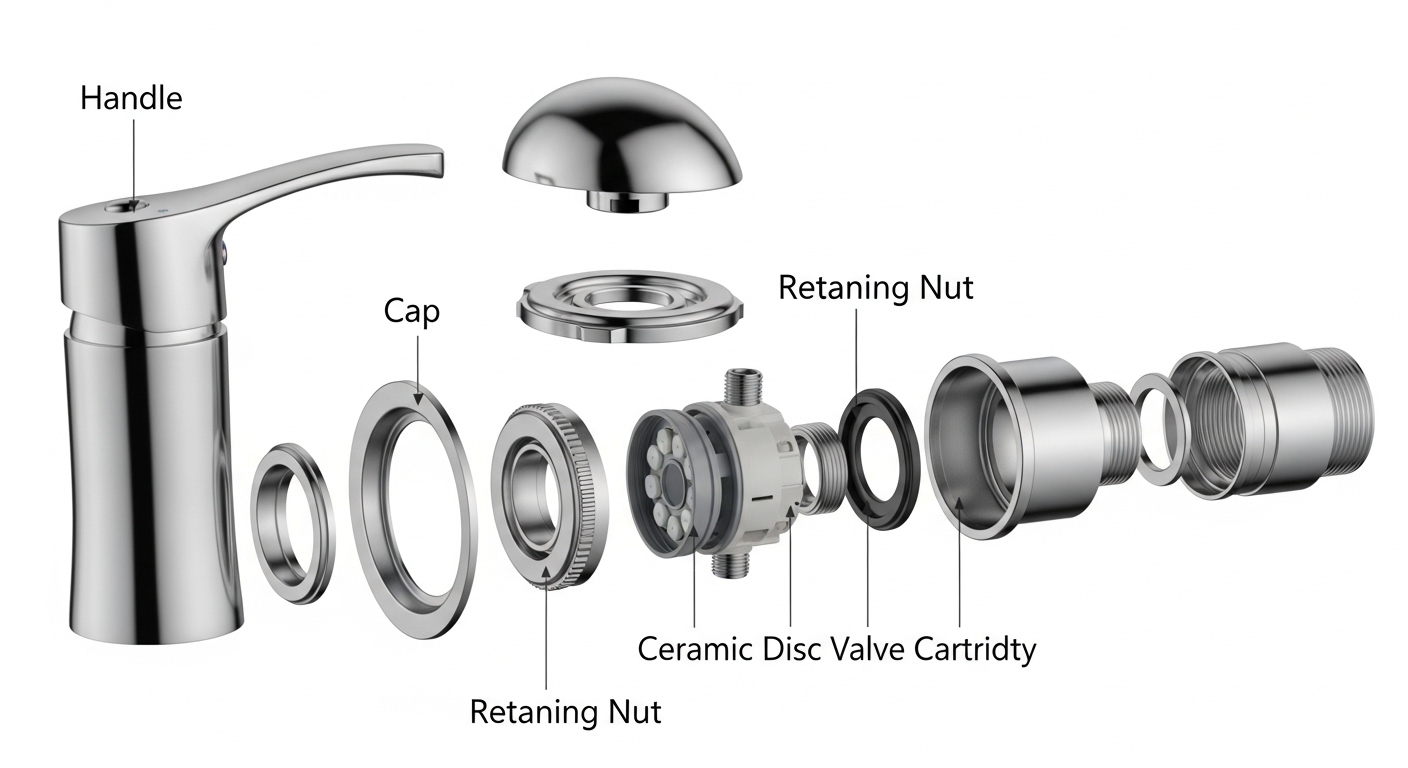
Before you change a kitchen tap valve, it helps to understand what you are replacing. Inside every kitchen faucet body sits a small mechanism that opens and closes the water path. When you lift or turn the handle, the valve aligns internal openings to let hot and cold water mix and flow out the spout. Over months and years, mineral scale, grit, and rubber-seal fatigue degrade that mechanism — and that is when the trouble starts.
There are four common valve types you will encounter:
- Ceramic disc valve — two polished ceramic plates slide against each other. Durable, drip-resistant, and standard on most modern single-handle faucets.
- Cartridge valve — a cylindrical insert, often brand-specific, used in both single- and double-handle faucets.
- Compression valve (stem/washer) — older two-handle faucets that use a rubber washer pressed against a seat. Easy and cheap to repair.
- Ball valve — a slotted metal or plastic ball, common in older single-handle kitchen faucets with a domed cap.
Signs You Need to Replace Your Kitchen Tap Valve
Not every faucet problem means a bad valve, but most do. Watch for these symptoms before you decide to change a kitchen tap valve:
- Constant dripping from the spout even when the handle is fully off.
- A stiff, grinding, or notchy handle that no longer moves smoothly.
- Water temperature that will not hold steady or swings hot and cold on its own.
- Reduced flow that an aerator cleaning does not fix.
- Squealing or chattering when the faucet is partly open.
- Leaking around the base of the handle rather than the spout.
If you see leaking at the spout base or under the sink instead, the issue may be O-rings or supply-line connections rather than the valve itself. When the faucet body itself is corroded or cracked, replacement is the better path — our guide on how to remove a kitchen faucet covers that scenario in detail.
Tools and Materials You’ll Need
Gather everything before you start so you are not running to the hardware store with the water shut off. Here is the standard kit:
- Adjustable wrench and a set of slip-joint pliers
- Phillips and flat-head screwdrivers
- Allen (hex) key set — many handles use a hidden set screw
- Replacement valve or cartridge that matches your faucet make and model
- Plumber’s grease (silicone-based) for O-rings and moving parts
- White vinegar and an old toothbrush for descaling
- A flashlight, a small towel, and a bowl to catch residual water
- A cartridge puller tool — optional but very helpful for stuck cartridges
Step-by-Step: How to Change a Kitchen Tap Valve
Step 1: Shut Off the Water Supply
Look under the sink for two shut-off valves on the hot and cold supply lines. Turn both clockwise until they stop. If your sink has no local shut-offs, close the main water supply for the house. Then open the faucet handle to release pressure and drain any water left in the lines. Place the towel and bowl in the cabinet to catch drips.
Step 2: Plug the Drain and Protect the Sink
Set a sink stopper or a rag in the drain opening. Small set screws and clips love to disappear down the drain, and this one habit saves a lot of frustration. Lay a towel across the sink basin to protect the finish and to keep parts organized in the order you remove them.
Step 3: Remove the Handle
Most single-handle kitchen faucets have a set screw hidden under a decorative cap or behind the handle. Pry off the cap gently with a flat-head screwdriver, then loosen the set screw with the correct hex key — do not fully remove it, just back it out enough to lift the handle straight up. Two-handle faucets usually have a screw under a hot/cold index button on top of each handle.
Step 4: Remove the Retaining Nut or Clip
With the handle off, you will see a dome cap, a retaining nut, or a horizontal retaining clip holding the valve in place. Unthread the nut with slip-joint pliers (wrap the jaws in tape to avoid scratching the finish), or pull the U-shaped clip straight out with needle-nose pliers. Keep these parts in your parts tray.
Step 5: Pull Out the Old Valve
Grip the top of the cartridge or valve stem with pliers and pull straight up with steady force. If it is stuck from mineral buildup, a cartridge puller tool gives you the leverage to remove it without damaging the faucet body. Twist slightly while pulling if it resists. Note the orientation of the old valve — many cartridges have a flat side or tab that must line up the same way on installation.
Step 6: Clean the Valve Seat
Inside the now-empty faucet body, you will likely find white or green mineral scale. Soak a vinegar-dampened cloth inside the cavity for a few minutes, then scrub gently with the toothbrush. A clean seat is essential — debris is the number one reason a brand-new valve still drips.
Step 7: Install the New Valve
Compare the new valve to the old one side by side to confirm it is an exact match. Apply a thin film of silicone plumber’s grease to the O-rings. Insert the new valve into the body, aligning any tab, notch, or flat exactly as the original sat. Press it down fully and evenly — it should seat without forcing.
Step 8: Reassemble and Test
Reinstall the retaining clip or nut, then the handle and set screw, then the decorative cap. Before tightening everything fully, slowly reopen the shut-off valves and check for leaks. Run the faucet hot and cold, cycle the handle through its full range, and confirm the drip is gone. Tighten any connection that weeps, and you are done.
Comparison: Kitchen Tap Valve Types
Choosing the right replacement is easier when you can see the trade-offs at a glance. The table below compares the four main valve types you might be swapping out.
| Valve Type | Typical Lifespan | Drip Resistance | Repair Difficulty | Best For |
|---|---|---|---|---|
| Ceramic disc | 15–30 years | Excellent | Easy | Modern single-handle kitchen faucets |
| Cartridge | 10–20 years | Very good | Easy to moderate | Single- and two-handle faucets |
| Compression (stem/washer) | 5–10 years | Fair | Very easy | Older two-handle faucets |
| Ball valve | 10–15 years | Good | Moderate | Older domed single-handle faucets |
If your current faucet uses a compression or ball valve, this repair is also a good moment to consider whether an upgrade to a modern ceramic disc faucet would save you future maintenance. A quality brass-bodied faucet with a ceramic cartridge is the most reliable long-term choice — our article on why brass faucets are the best choice for your home explains the durability difference.
How to Identify the Correct Replacement Valve
The most common mistake DIYers make is buying a valve that almost fits. Cartridges in particular are highly brand- and model-specific. Use these methods to get an exact match:
- Bring the old valve to the store. A physical comparison beats guessing every time.
- Find the faucet model number. It is often stamped under the spout, on the supply lines, or in the original paperwork.
- Photograph the valve from multiple angles including the top, side, and base before you leave home.
- Measure length and diameter with calipers if you cannot identify the model.
- Check for left/right or hot/cold versions — some two-handle cartridges are side-specific.
When in doubt, contact the faucet manufacturer directly with your model number. Reputable brands keep replacement valves available for years, which is one reason buying from an established maker matters. If you are evaluating overall faucet quality, our guide on how to identify the quality of a faucet is a useful companion read.
Common Mistakes to Avoid
Even a simple repair can go sideways. Keep these pitfalls in mind when you change a kitchen tap valve:
- Forgetting to shut off the water — an obvious one, but it happens, and the cleanup is miserable.
- Over-tightening the retaining nut — this can crack the cartridge or warp the ceramic discs.
- Skipping the cleaning step — leftover grit will damage a new valve within weeks.
- Using petroleum grease instead of silicone — petroleum products degrade rubber O-rings.
- Installing the valve in the wrong orientation — this can reverse hot and cold or block flow entirely.
- Reusing worn O-rings — replace them while you have the faucet apart; they cost pennies.
When to Call a Professional Plumber
Most kitchen tap valve replacements are well within DIY range, but call a licensed plumber if you encounter a corroded faucet body that will not release the valve, supply lines that are seized or leaking at the wall, no working shut-off valves anywhere in the system, or a faucet so old that parts are simply unavailable. In that last case, replacing the faucet is more cost-effective than chasing obsolete components — and you get a fresh warranty in the bargain.
Author Note & Brand Credibility
This guide was written and reviewed by the VIGA Faucet product team, drawing on hands-on experience from our own quality-control bench. VIGA is a professional faucet manufacturer with over 20 years of experience producing kitchen and bathroom fixtures for customers worldwide. Every VIGA faucet valve is life-cycle tested — our ceramic cartridges are rated for 500,000 open-close cycles — and our products are manufactured to meet international standards such as cUPC and CE. We back our faucets with a multi-year warranty on the valve and finish, because we stand behind the components that matter most. The instructions above reflect the same procedures our technicians use, adapted for home repair.
FAQ
How long does it take to change a kitchen tap valve?
For most single-handle faucets, plan on 30 to 45 minutes including cleanup. If the valve is heavily scaled and stuck, or if you need a trip to the store to match parts, it can stretch to a couple of hours. Having the correct replacement valve and tools ready beforehand is the biggest time-saver.
Can I change a kitchen tap valve myself without a plumber?
Yes. A valve or cartridge swap is one of the most beginner-friendly plumbing repairs. As long as you can shut off the water supply, remove the handle, and match the replacement part correctly, no special skills are required. Call a professional only if the faucet body is corroded or the shut-off valves do not work.
How much does a replacement kitchen tap valve cost?
A standard ceramic disc cartridge or compression stem typically costs between 10 and 40 US dollars, depending on the brand. Proprietary cartridges from premium faucet brands can run higher. Either way, it is far cheaper than replacing the entire faucet, which is why diagnosing the valve first is always worthwhile.
Why does my faucet still drip after I replaced the valve?
The two most common reasons are debris left on the valve seat and a valve that is not an exact match for your faucet. Remove the new valve, thoroughly clean the cavity with vinegar, confirm the part number, and check that the O-rings are seated and lightly greased before reinstalling.
What is the difference between a cartridge and a valve?
The terms overlap in everyday use. “Valve” is the general word for the flow-control mechanism inside a faucet, while “cartridge” refers specifically to the self-contained cylindrical type that you pull out and replace as one unit. Ceramic disc, ball, and compression mechanisms are all types of valves, but only some are cartridges.
How often should a kitchen tap valve be replaced?
A quality ceramic disc valve can last 15 to 30 years, while compression washers may need attention every 5 to 10 years. Hard water shortens these lifespans because mineral scale accelerates wear. If you notice dripping or a stiff handle, replace the valve promptly — running a worn valve can damage the faucet body over time.
WeChat
Scan the QR Code with WeChat