 English
 Deutsch
 Français
 Italiano
 Español
 Português
 Nederlands
 Polski
 Русский
 日本語
日本語 한국어
한국어 العربية
 China Faucet Factory & OEM/ODM Faucet Manufacturer
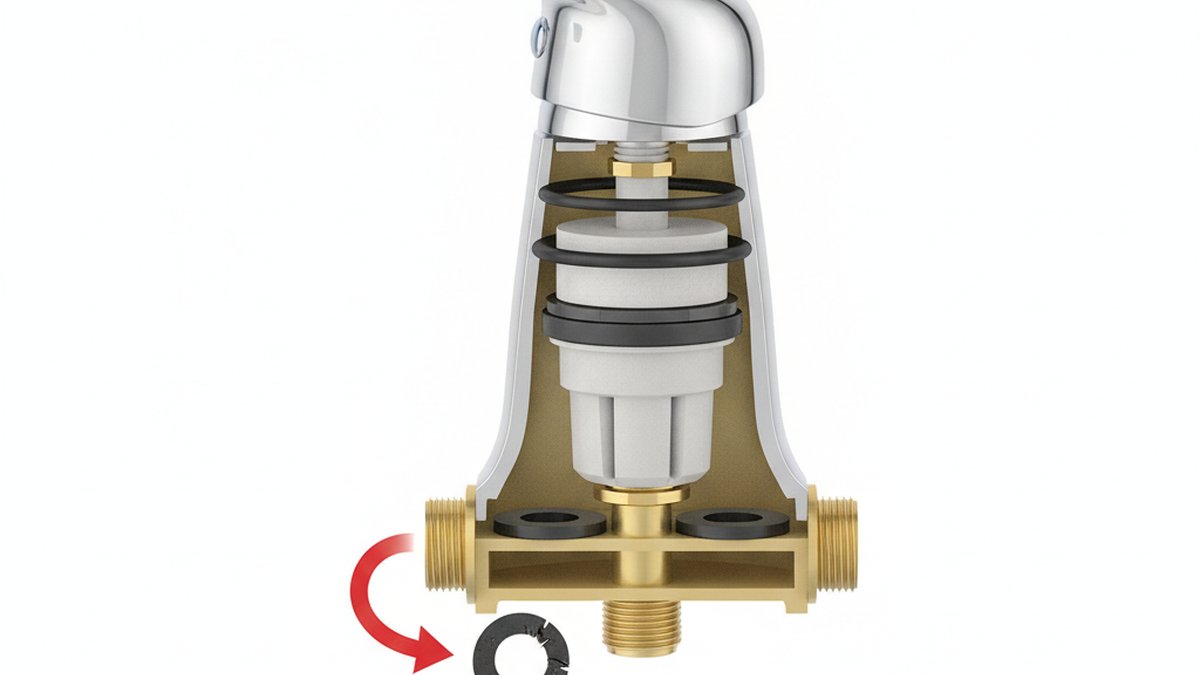
Learning how to fix a leak on a faucet is one of the highest-payoff home repairs you can do, because 90% of the time the faucet body is fine — a single cheap rubber or ceramic part inside has worn out. A dripping faucet can waste over 3,000 gallons a year (that’s roughly 180 showers down the drain), so the leak is costing you money every day you wait. The good news: with an adjustable wrench, a screwdriver, and a $6 repair part, an average person fixes this in under an hour on a Saturday morning.
Below I’ll walk you through diagnosing exactly where the water is coming from, what part to buy, and the step-by-step repair — plus the specific fixes for the four faucet types you’ll actually run into.
Why is my faucet leaking in the first place?
Your faucet is leaking because a rubber or ceramic sealing part inside it has worn out, corroded, or loosened — water is now getting past a seal that used to be watertight. It is almost never the metal faucet body itself. Once you know which seal failed, the repair is straightforward.
Here are the usual culprits, from most to least common:
- Worn rubber washer or seat — the classic cause of a steady drip from the spout on older two-handle faucets. The washer flattens and hardens over time.
- Cracked or dried-out O-rings — these seal the spout and cartridge; when they fail you get a leak around the base of the spout, especially when the water is running.
- Failed ceramic cartridge — modern single-handle faucets use a cartridge instead of washers. When it wears, you get dripping or a handle that won’t fully shut off.
- Loose or corroded packing nut — if water seeps from under the handle, the packing nut has loosened or the packing washer beneath it has degraded.
- Bad supply-line connection — a leak under the sink (not at the spout) usually means a loose compression nut or a worn braided supply hose.
- Mineral buildup — hard water deposits chew up seals and clog the aerator, causing both drips and spitting, uneven flow.
Pinpoint the location before you buy anything. A drip from the spout tip = washer or cartridge. Water pooling around the base of the spout = O-rings. Wetness under the handle = packing nut. Water in the cabinet below = supply line or, if it’s coming up through the mounting holes, a base seal. If your water is welling up around the deck plate rather than the spout, our companion guide on why your sink is leaking from the faucet base and how to fix it yourself covers that specific failure in detail.
What tools and parts do I need before I start?
You need very little: an adjustable wrench, a set of screwdrivers (Phillips and flat), an Allen/hex key set, plumber’s grease, PTFE thread-seal tape, and the specific replacement part for your faucet. Total cost is typically $10–$30, and you likely own most of the tools already.
Here’s the full kit so you only make one trip:
- Adjustable wrench (and channel-lock pliers for stubborn nuts)
- Phillips + flathead screwdrivers
- Hex/Allen key set (many single-handle faucets use a set screw)
- Replacement washers, O-rings, or a cartridge — bring your old part or faucet model number to the store to match it exactly
- Plumber’s grease (silicone-based) to lubricate O-rings and cartridges
- PTFE thread tape for re-sealing threaded connections
- White vinegar + an old toothbrush to dissolve mineral scale
- A rag and a small bowl to catch water and hold small parts
- A phone to photograph each step as you disassemble — this is your reassembly map
One tip that saves a second trip: faucet cartridges and washers are brand- and model-specific. If you can find your faucet’s model number (often stamped under the spout or on the original paperwork), buy the exact manufacturer repair kit. A universal washer assortment works for old-style faucets, but modern cartridge faucets almost always need the matching part.
How to fix a leak on a faucet: the step-by-step repair
To fix a leak on a faucet, shut off the water, disassemble the handle, replace the worn seal, and reassemble in reverse. Follow these steps in order and you’ll have it done in 30–45 minutes.
- Shut off the water. Turn the two valves under the sink clockwise until they stop. No under-sink valves? Shut off the house main. Then open the faucet to release pressure and confirm the water is truly off.
- Plug the drain. Drop in the stopper or lay a rag over it. This keeps the tiny screws and springs from disappearing down the drain — a mistake that turns a 40-minute job into a two-day one.
- Remove the handle. Pry off the decorative cap on top, then remove the screw underneath (Phillips or hex). Lift the handle straight up. If it’s stuck from mineral buildup, wrap it in a vinegar-soaked rag for 10 minutes and wiggle gently.
- Take out the guts. For a cartridge faucet, unscrew the retaining nut or pull the retaining clip, then pull the cartridge straight up (a cartridge-puller tool helps if it’s seized). For a compression faucet, unscrew the packing nut and lift out the stem to reach the washer at the bottom.
- Inspect and replace. Look at the rubber washer, the O-rings, and the valve seat. Anything cracked, flattened, hardened, or grooved gets replaced. Match the new part to the old one exactly.
- Clean everything. Scrub away mineral scale with vinegar and the toothbrush, especially on the valve seat where the washer presses down. A pitted seat will chew up a brand-new washer within weeks.
- Grease and reassemble. Smear a thin film of plumber’s grease on the new O-rings and cartridge. Reinstall parts in reverse order, wrapping PTFE tape clockwise on any threaded fittings. Don’t overtighten — snug plus a quarter turn is plenty; cranking down cracks ceramic and crushes seals.
- Turn the water back on slowly. Open the shutoff valves gradually, then run the faucet hot and cold and check for drips at the spout, base, and handle. Look underneath with a flashlight for any new leaks.
If, after all this, the spout still drips or the flow is weak and sputtery, unscrew the aerator at the tip of the spout and clean or replace it — clogged aerators are behind a surprising share of “leak” complaints. Our guide to the best bathroom faucet aerator for water savings and splash-free flow explains how to pick the right replacement and thread size.
How do I fix a leak on each faucet type? (compression, cartridge, ball, ceramic disc)
The fix depends on your faucet’s internal mechanism. There are four types, and each fails and repairs a little differently. Here’s how to tell them apart and what to do for each.
| Faucet type | How to spot it | Most common leak cause | The fix | Part cost |
|---|---|---|---|---|
| Compression | Two handles you screw tight to shut off; older homes | Worn rubber washer / pitted seat | Replace washer + reseat or replace valve seat | $2–$8 |
| Cartridge | Single or double handle that moves smoothly, no tightening | Worn cartridge or O-rings | Pull and replace the whole cartridge | $10–$40 |
| Ball | Single handle over a dome-shaped cap; common in kitchens | Worn springs, seats, or ball | Install a ball-faucet repair kit | $15–$30 |
| Ceramic disc | Single lever, wide cylindrical body; premium modern faucets | Worn seals or cracked disc from hard water | Replace seals or the disc cartridge | $20–$50 |
Compression faucets are the easiest and cheapest: the culprit is nearly always the rubber washer at the bottom of the stem. Replace it, and if the metal valve seat it presses against is rough or pitted, resurface it with a seat-dressing tool or swap the seat entirely.
Cartridge faucets (the most common today) rarely reward you for fixing individual parts — pull the whole cartridge and drop in a matching new one. Note the orientation before you remove it, because installing it rotated 180° reverses your hot and cold.
Ball faucets have the most small parts — springs, rubber seats, cam, and the ball itself. Don’t try to guess which one failed; buy the complete repair kit and replace them all at once. It’s cheap insurance against a second teardown.
Ceramic disc faucets are the most durable and leak the least, but hard water can crack the disc or wear the neoprene seals. Clean the seals, and if the leak persists, replace the disc cartridge.
Do I need to replace the whole faucet, or just repair the leak?
Repair the leak if the faucet body is solid and only a seal has failed — which is the case the vast majority of the time. Replace the whole faucet only if the body is cracked, the finish is badly corroded, replacement parts are discontinued, or you’ve already rebuilt it once and it’s still leaking.
Here’s my rule of thumb after years around fixtures: a faucet under about 8–10 years old with an available repair kit is worth fixing every time — you’re spending $10–$40 versus $150+ for a new unit plus installation. But if the faucet is decades old, the chrome is flaking, you can’t source parts, or you’re already tired of the way it looks, replacement is the smarter money. A modern faucet also brings water-saving aerators and better ceramic-disc valves that simply leak less.
If you land on replacement and it’s a kitchen faucet, don’t assume you need a pro — swapping one out is genuinely a one-afternoon job for most people. Our walkthrough on whether replacing a kitchen faucet is easy enough to do yourself in an afternoon lays out the full process. And if your leak is actually in a shower or handheld unit rather than a sink, the parts and repair logic differ — see our breakdown of the handheld shower head parts you should know before you repair one.
How do I stop a faucet leak from coming back?
Prevent repeat leaks by using the right lubricant, not overtightening, and controlling hard water. Most faucets that leak again within a year do so because a seal was installed dry, a fitting was cranked down too hard and cracked, or mineral scale is grinding the parts down.
- Always grease new seals. A thin film of silicone plumber’s grease lets O-rings and cartridges seat properly and glide instead of tearing. Never use petroleum jelly — it degrades rubber.
- Hand-tight plus a quarter turn. Overtightening is the number-one DIY mistake. It crushes washers, cracks ceramic discs, and strips threads.
- Seal threads correctly. Wrap PTFE tape clockwise 3–4 times on threaded connections. For which fittings need tape versus sealant versus nothing, our guide on what to use for tub spout installation — sealant, thread tape, or nothing explains the logic that applies to faucets too.
- Tackle hard water. If you have hard water, descale the aerator and cartridge with vinegar every few months, and consider a whole-home softener. Scale is the silent killer of faucet seals.
- Buy quality parts. A $2 no-name washer that fits “close enough” fails fast. Match the manufacturer’s part, or buy a faucet with a solid warranty from the start.
FAQ
Why does my faucet still drip after I replaced the washer?
Because the valve seat the washer presses against is pitted or corroded, so even a brand-new washer can’t form a watertight seal. Resurface the seat with a seat-dressing (reseating) tool or replace the seat entirely. The other common reason is a worn O-ring or cartridge you didn’t replace, or a washer that isn’t the exact right size.
Can I fix a leaking faucet without turning off the water?
No — always shut off the water first. Disassembling a faucet under pressure will spray water across your bathroom or kitchen and can damage the internal parts. Turn the under-sink shutoff valves clockwise, or shut the house main if you don’t have local valves, then open the faucet to bleed off remaining pressure before you start.
How much does it cost to fix a faucet leak yourself versus hiring a plumber?
Doing it yourself costs roughly $5–$40 for parts, since you likely already own the tools. A plumber typically charges $150–$350 for the same repair once you factor in the service call and labor. Unless the faucet body is cracked or the shutoff valves themselves are seized, this is one of the best DIY value repairs in the house.
How do I know if the leak is the cartridge or the O-rings?
If the faucet drips from the spout tip when it’s turned off, suspect the cartridge (or washer on older faucets). If water leaks or pools around the base of the spout while the water is running, the O-rings that seal the spout are the culprit. Water seeping from under the handle points to the packing nut or packing washer.
Is a dripping faucet an emergency, or can it wait?
A slow drip from the spout isn’t a flooding emergency, but don’t ignore it — a single dripping faucet can waste over 3,000 gallons a year and slowly damage the sink finish. Water leaking inside the cabinet or from the supply lines is more urgent, because it can rot the vanity and grow mold. Shut off that valve and repair it promptly.
Will fixing a leak myself void my faucet’s warranty?
Replacing user-serviceable parts like washers, O-rings, aerators, and cartridges generally does not void a faucet warranty — manufacturers expect these to be maintained. However, disassembling the sealed valve body or using non-approved parts can. Check your specific warranty terms, and when in doubt use the manufacturer’s own repair kit to stay covered.
About the author: This guide was written by VIGA’s fixtures team, drawing on years of hands-on faucet installation, testing, and repair across kitchen, bath, and tub applications. We’ve torn down and rebuilt every faucet type described here.
Why trust VIGA: VIGA designs and manufactures faucets and bathroom fixtures with valves built to industry cycle-testing standards — our ceramic-disc cartridges are tested to hundreds of thousands of open-close cycles for drip-free performance, and our fixtures are backed by a manufacturer’s warranty. We build the products, so we know exactly what fails, why, and how to fix it. Explore our full range at www.vigafaucet.com.
WeChat
Scan the QR Code with WeChat