 English
 Deutsch
 Français
 Italiano
 Español
 Português
 Nederlands
 Polski
 Русский
 日本語
日本語 한국어
한국어 العربية
 China Faucet Factory & OEM/ODM Faucet Manufacturer
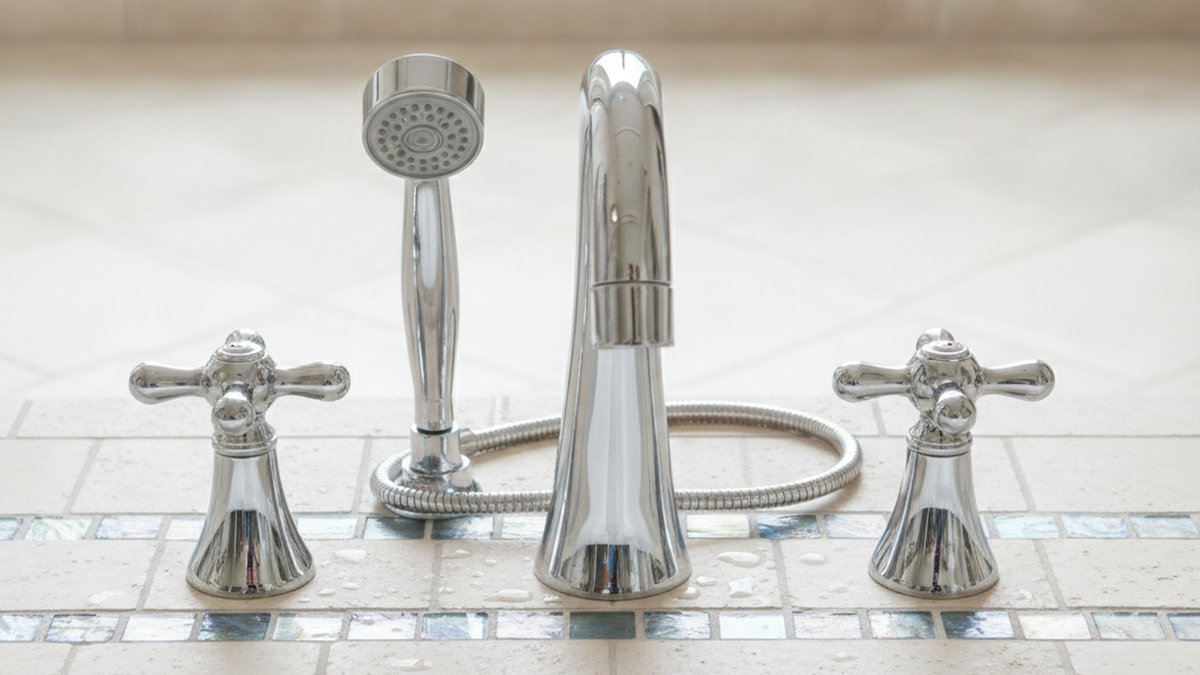
If you’re staring at a boxed kit and searching how a pfister roman tub faucet installation actually goes, here’s the honest version: it’s more forgiving than a wall-mounted valve because everything mounts on top of the deck, but it lives or dies on two things — matching your deck’s hole spacing, and getting access underneath to tighten the connections. Get those right and the rest is methodical. This guide walks through the whole job the way a knowledgeable installer friend would explain it: what a Roman tub filler is, whether you can DIY it, the exact steps, the tools, the common leaks, and how it compares to other tub-filling setups so you buy the right thing the first time.
VIGA has manufactured deck-mount and freestanding tub fillers for the global market for over 20 years, and we test every faucet body to industry flow and pressure standards before it ships. So while this article focuses on Pfister’s Roman tub line — because that’s what people search — the installation logic applies to any quality deck-mounted tub filler, including ours.
What Exactly Is a Roman Tub Faucet, and How Is It Different From a Regular Tub Spout?
A Roman tub faucet is a deck-mounted tub filler — it sits on the flat rim (the “deck”) around your bathtub instead of on the wall. Unlike a standard tub spout that pokes out of a tiled wall, a Roman filler has a tall, arched spout designed to pour a wide stream of water down into a deep soaking tub, plus separate hot and cold handles (and often a handheld sprayer).
The name comes from the Roman-bath look — a freestanding-feeling tub with the faucet rising off the deck. Practically, what matters is that all the working parts mount through holes drilled in the deck, and all the connections happen underneath, in the space below the tub. That’s why access is the number-one factor in whether this is an easy job or a miserable one.
Pfister sells Roman tub fillers in both 3-hole and 4-hole configurations, in finishes like polished chrome, brushed nickel, and Tuscan bronze. The 4-hole versions add a deck-mounted handheld sprayer alongside the spout and two handles. If you want the deeper breakdown of the sprayer setup specifically, we cover it in our guide to the Roman tub faucet with sprayer 4-hole configuration.
| Setup | Where It Mounts | Typical Holes | Best For |
|---|---|---|---|
| Roman tub faucet (deck-mount) | On the tub deck/rim | 3–4 holes, 8″ spread | Drop-in and undermount soaking tubs with a deck |
| Wall-mounted tub spout | On the tiled wall | 1 spout hole + valve | Standard alcove tub/shower combos |
| Freestanding tub filler | Floor or wall inlet | Floor mount or wall inlet | Standalone freestanding tubs with no deck |
| Roman filler with sprayer | On the tub deck/rim | 4 holes | Deck tubs where you want a rinse sprayer |
If your tub has no deck at all — it’s a standalone sculptural tub — a Roman filler isn’t your product. In that case read up on the freestanding tub faucet with wall water inlet instead, which solves the same problem for tubs that sit away from any wall or ledge.
Can You Install a Pfister Roman Tub Faucet Yourself, or Do You Need a Plumber?
Yes, most homeowners can install a Pfister Roman tub faucet themselves in an afternoon — if you can physically reach the underside of the tub deck. That access is the whole ballgame. The connections themselves are standard 1/2-inch supply fittings, and Pfister designs its Roman kits so the valve bodies drop in from above and lock down with a mounting nut from below.
Here’s the reality check on when to call a pro:
- DIY-friendly: There’s an access panel, a removable skirt, or an open framing bay under the tub deck so you can reach up to the valve bodies and spout riser.
- DIY-friendly: The deck is already drilled with the correct number of holes at the right spacing, and you’re simply replacing an old Roman filler with a new one.
- Call a plumber (or a tile pro): The deck is solid tile or stone and needs new holes drilled with a diamond bit — one cracked slab and you’ve spent more than the plumber would’ve cost.
- Call a plumber: There’s zero access below the deck and the tub would need to be pulled to reach the fittings.
If you’ve swapped a kitchen faucet before, you already have most of the skills. The tub version is honestly similar in spirit — see our take on whether replacing a kitchen faucet is easy enough to do yourself for the same tight-space, supply-line mindset.
What Tools and Parts Do You Need Before You Start?
You need about six basic tools and the deck-mount kit itself — no specialty plumbing gear for a straight replacement. Gathering everything first is what turns a 4-hour job into a 2-hour one, because half the pain of tub work is crawling out from under the deck to fetch one more thing.
Have these ready:
- Adjustable wrench and a basin wrench — the basin wrench reaches the mounting nuts in the cramped space under the deck.
- Channel-lock pliers for holding valve bodies while you tighten.
- Plumber’s putty or 100% silicone caulk to seal each escutcheon/base against the deck.
- PTFE thread-seal tape (Teflon tape) for the threaded supply connections.
- Flexible braided supply lines rated for the connection — buy new ones; don’t reuse crusty old lines.
- A bucket, towels, and a flashlight or headlamp.
On sealant, there’s a real debate about putty versus silicone versus tape at each connection point. The short answer: thread tape or pipe dope on the threaded water connections, and putty or silicone under the trim where it meets the deck. We break down exactly which goes where in our guide on what to use for tub spout installation — sealant, thread tape, or nothing, and it’s worth a two-minute read before you commit.
What Are the Actual Step-by-Step Installation Steps?
The core sequence is: shut off water, set the valve bodies and spout into the deck holes, seal the bases, connect the supplies and riser underneath, then pressure-test. Here’s the full walkthrough.
Step 1: Shut off the water and clear the deck
Turn off the hot and cold supplies — either the dedicated shutoffs for the tub or the main. Open the old faucet to relieve pressure and drain the lines. If you’re removing an old Roman filler, disconnect its supplies from below and lift the trim off the deck. Scrape away all old putty or silicone so you’re mounting onto a clean, flat surface.
Step 2: Dry-fit the valve bodies and spout
Set the two handle valve bodies, the spout, and (on 4-hole kits) the sprayer into their deck holes without sealant first. Confirm everything sits flush and the handles will clear the tub rim and wall when they turn. Pfister Roman kits are typically built for an 8-inch center-to-center spread on the handles — measure your existing holes and confirm they match the kit before you commit sealant.
Step 3: Seal and secure from below
Apply a bead of plumber’s putty or silicone under each base, seat the parts, and go underneath to thread on the mounting nuts and washers. Snug them with the basin wrench — firm, not gorilla-tight, since overtightening can crack trim or distort washers. Wipe the squeeze-out of putty from the top before it sets.
Step 4: Connect supplies and the spout riser
Connect hot to the correct valve (hot on the left, cold on the right, from the user’s point of view) using the flexible supply lines, with thread tape on the threaded fittings. Then connect the spout riser tube from the valve manifold to the spout — this is the part that carries mixed water up to the spout, and a loose connection here is the most common leak.
Step 5: Turn the water back on and pressure-test
Open the shutoffs slowly. Run hot, then cold, then both. Get under the deck with your flashlight and watch every connection for drips for a solid few minutes. Test the diverter and sprayer if equipped. Only after a clean pressure test should you close up any access panel or re-tile.
Why Is My Newly Installed Roman Tub Faucet Leaking at the Base?
A Roman tub faucet leaking at the base almost always comes from one of three things: a mounting nut that isn’t tight enough underneath, a failed seal between the trim and the deck, or a loose spout-riser connection sending water where it shouldn’t go. The good news is all three are fixable without replacing the faucet.
Work through them in order. First, feel whether the leak shows up only when water runs (a supply or riser connection) or whether water pools around the base even when off (a deck seal issue). Tighten the mounting nut from below first, since it’s the easiest fix. If water is wicking up around the escutcheon, you likely need to pull the trim, re-apply putty or silicone, and reset it. Our full diagnostic on why a sink leaks from the faucet base and how to fix it yourself uses the same troubleshooting logic — the physics are identical on a tub deck.
One thing installers learn the hard way: don’t overtighten to stop a leak. If snugging the nut doesn’t seal it, the problem is the washer or the seal surface, and cranking harder just cracks things. Back off, inspect, and reseat.
How Does a Pfister Roman Tub Faucet Compare to Other Brands for Ease of Install?
Pfister is one of the more DIY-friendly Roman tub brands because its kits use a straightforward drop-in valve body with a below-deck mounting nut, and it stands behind them with a limited lifetime warranty on the finish and function for residential use. That combination — simple mounting plus strong warranty — is what makes people search for it by name.
That said, “which brand installs easiest” depends less on the logo and more on whether the kit matches your holes and finish. If you’re comparing Pfister’s broader lineup, our Pfister Zanna kitchen faucet review gives a sense of the brand’s build quality and hardware feel, which carries over to their tub line.
| Factor | What to Check | Why It Matters |
|---|---|---|
| Hole spread | Measure center-to-center (often 8″) | A mismatch means the kit physically won’t fit |
| Number of holes | 3-hole vs 4-hole (with sprayer) | You can’t add a sprayer hole to solid stone easily |
| Deck thickness | Kit’s max deck thickness spec | Thick stone decks need longer valve stems/nuts |
| Finish | Chrome, brushed nickel, bronze | Match other fixtures in the room |
| Warranty | Lifetime vs limited years | Long warranties signal tested, serviceable parts |
Which Finish Should You Choose, and Will It Hold Up Around a Tub?
For a tub deck, pick a finish that resists water spotting and matches your other bathroom hardware — brushed nickel and matte black hide water spots best, while polished chrome is easiest to wipe clean but shows droplets. Around a wet, humid tub, the finish quality matters more than in a dry powder room, so a physical-vapor-deposition (PVD) or well-plated finish is worth paying for.
A few practical notes from years of building these:
- Polished chrome — cheapest, brightest, shows every water spot, but wipes clean in one swipe.
- Brushed/satin nickel — the forgiving all-rounder; hides spots and fingerprints, matches most decor.
- Tuscan/oil-rubbed bronze — warm, traditional, great for a Roman-style tub, but confirm it’s a durable coating not a living finish if you want it to stay uniform.
- Matte black — modern and spot-hiding, but check the coating is rated for wet areas.
Whatever you choose, match the handles too. If you ever replace just the handles down the road, the same finish-matching rules apply — our note on choosing a polished nickel faucet handle covers how finishes read differently under bathroom lighting.
How Long Does It Take and What Does It Cost?
A straight replacement of an existing Roman tub filler takes most DIYers 2–4 hours; a fresh install that requires drilling deck holes can run a full day and is where hiring help pays off. On cost, the faucet kit itself typically runs from around $120 for a basic 3-hole set to $400+ for a 4-hole sprayer kit in a premium finish, plus $20–40 in supply lines, tape, and sealant.
Compare that to $200–500 for professional labor, and the DIY math is compelling — as long as you’re doing a replacement, not a first-time drilled install into stone. The single most expensive mistake isn’t labor; it’s buying a kit that doesn’t match your hole spread and only discovering it after you’ve opened the box and voided the return.
FAQ
Do all Pfister Roman tub faucets fit an 8-inch hole spread?
Most Pfister Roman tub fillers are built for a standard 8-inch center-to-center spread on the handles, but always confirm the exact spec on your specific model before buying. Measure the distance between the centers of your existing deck holes and match it to the kit — a half-inch difference means it won’t seat correctly.
Can I install a Roman tub faucet if I only have 3 holes but want a sprayer?
No — a handheld sprayer needs its own dedicated hole, so a 4-hole sprayer kit requires four holes in the deck. If your deck has only three holes and you want a sprayer, you’d need to drill a fourth hole (easy in acrylic or fiberglass, risky and best left to a pro in tile or stone) or choose a 3-hole kit without the deck sprayer.
What’s the most common mistake during a Pfister Roman tub faucet installation?
The most common mistake is skipping the dry-fit and pressure-test steps. People seal and connect everything, then discover the handles hit the tub rim or a riser connection leaks — after the sealant has cured. Always dry-fit before applying putty and always run water and inspect every connection before closing up any access panel.
Should I use plumber’s putty or silicone under the faucet base?
Either works for sealing the trim to the deck; plumber’s putty is easier to clean up and reposition, while 100% silicone bonds more permanently and is better on porous stone. Use thread-seal tape (not putty) on the threaded water connections underneath. Our tub-spout sealant guide breaks down each connection point in detail.
Do I need to shut off the whole house water to install one?
Not necessarily — if your tub has dedicated hot and cold shutoff valves accessible below the deck, you can close just those. If there are no local shutoffs, you’ll need to close the main water supply for the house while you work. Either way, open the faucet afterward to drain residual pressure before disconnecting anything.
Is a deck-mount Roman filler harder to install than a wall-mounted tub spout?
It’s not harder in terms of skill, but it demands access to the underside of the tub deck, which a wall spout doesn’t. If you have an access panel or open framing, a Roman filler is a comfortable DIY job. If the deck is fully enclosed with no way underneath, the wall-mounted or a different configuration may be far more practical.
Author note: This guide was written by the VIGA product and installation team, drawing on 20+ years of manufacturing deck-mount and freestanding tub fillers for markets worldwide. Every VIGA tub filler body is bench-tested for flow rate and pressure sealing before shipment, and our fixtures are built to standard 1/2-inch connection specs so they integrate with common valve rough-ins. Always follow your specific faucet’s included instructions and local plumbing codes; when in doubt about drilling stone decks or accessing enclosed plumbing, consult a licensed plumber.
WeChat
Scan the QR Code with WeChat