 English
 Deutsch
 Français
 Italiano
 Español
 Português
 Nederlands
 Polski
 Русский
 日本語
日本語 한국어
한국어 العربية
 China Faucet Factory & OEM/ODM Faucet Manufacturer
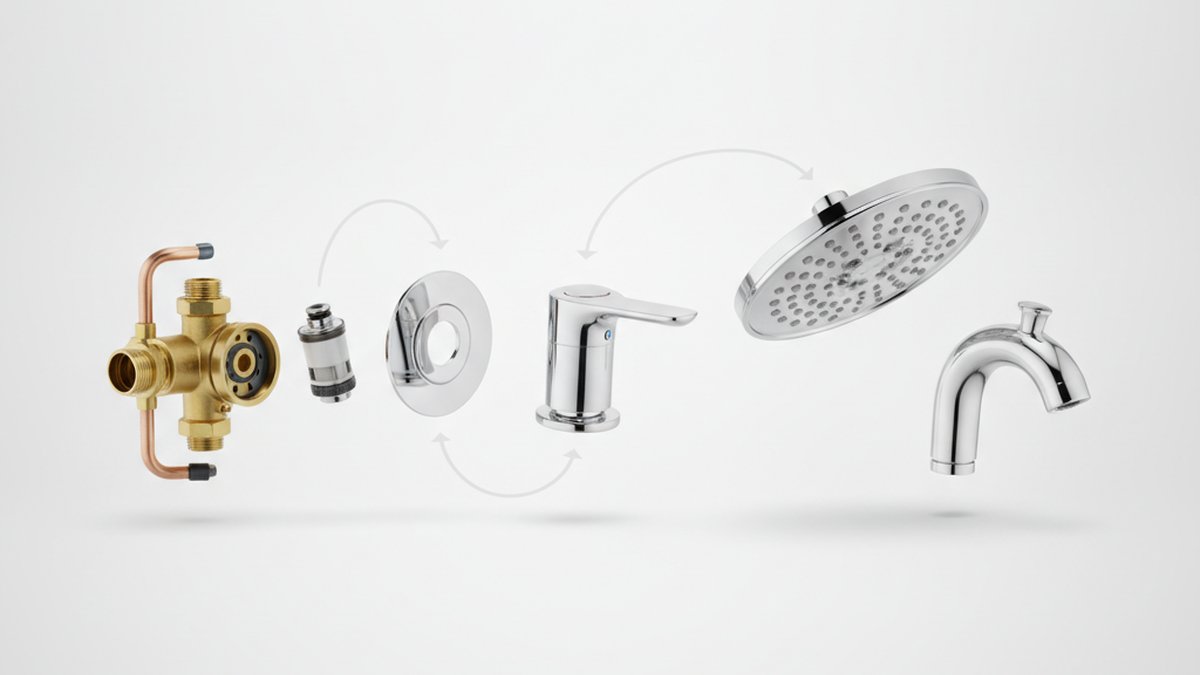
If you’ve ever tried to match a fancy shower trim to a valve you already have — and discovered they don’t fit — you already understand why a shower faucet combo with valve exists. It’s the whole system in one box: the mixing valve that hides in the wall plus the finished parts that bolt onto it, engineered to work together out of the gate. No guessing about cartridge types, no ordering a separate rough-in and praying the stems line up. For a bathroom remodel or a new build, it’s the least error-prone way to buy a shower, and it’s usually cheaper than sourcing the pieces à la carte.
Below, I’ll walk you through exactly what’s in the box, how to pick the right valve type, what sizes and specs actually matter, and where combos go wrong — the way I’d explain it to a friend standing in the plumbing aisle.
What exactly comes in a “shower faucet combo with valve”?
A true combo includes two things that are usually sold separately: the rough-in valve body (installed before the wall is tiled) and the trim kit (installed after). Most combos also bundle at least one water outlet — a showerhead, a tub spout, or both.
Here’s what you’ll typically find inside a mid-range shower faucet combo with valve:
- Valve body — the brass or DZR-brass housing with hot/cold inlets and one or more outlets, meant to sit inside the wall cavity.
- Cartridge — the replaceable core that mixes and controls water. This is the part that determines whether your shower is pressure-balanced or thermostatic.
- Trim plate (escutcheon) — the decorative round or square plate that covers the wall opening.
- Handle(s) — single-function (on/off + temp) or with a separate volume/diverter control.
- Showerhead — commonly a 2.5 GPM fixed head; rain heads run 1.75–2.5 GPM.
- Tub spout or diverter — on tub-and-shower combos, a spout that redirects water up to the head.
- Mounting hardware, screws, and a test cap/plaster guard for the rough-in stage.
The plaster guard matters more than people expect: it protects the valve during tiling and lets your plumber pressure-test the lines before the trim ever goes on. A combo that skips it is cutting a corner.
Do I really need the valve, or can I just buy the trim?
You need the valve if you don’t already have a compatible one in the wall — and “compatible” is stricter than most people think. Trim only bolts onto its matching valve family; a Delta trim won’t sit on a Moen valve, and even within one brand, older valves may not accept newer trim. That’s the single biggest reason people end up buying a full combo instead of just the pretty part.
Buy the combo (valve + trim together) when:
- It’s new construction or a gut remodel — the wall is open, so you’re installing a valve anyway.
- Your existing valve is a corroded, discontinued, or leaking unit that’s cheaper to replace than to source parts for.
- You want one manufacturer, one warranty, and zero compatibility risk.
Buy trim only when your in-wall valve is recent, the same brand, and in good shape — you’re just refreshing the look. If you’re mid-project and the valve stem sits too deep behind new, thicker tile, you don’t need a whole new combo — you need an extension. Our guide on how to install a Moen shower valve extension the right way covers that exact fix.
Pressure-balanced vs. thermostatic: which valve type should I get?
For most homes, a pressure-balanced valve is the right, safest, and most affordable choice; upgrade to a thermostatic valve only if you want precise, repeatable temperature control or you’re running multiple sprays at once. Both prevent scalding, but they do it differently.
A pressure-balanced valve reacts to changes in water pressure — when someone flushes a toilet and cold-water pressure drops, it throttles the hot side to keep your temperature roughly steady. A thermostatic valve reacts to actual temperature, holding your set degree even as incoming supply shifts, and it separates temperature control from volume so you can dial flow up and down without losing your setting.
| Feature | Pressure-Balanced Combo | Thermostatic Combo |
|---|---|---|
| Anti-scald protection | Yes (reacts to pressure) | Yes (reacts to temperature) |
| Holds exact temperature | Approximate | Precise (±1–2°F) |
| Separate volume + temp controls | Usually no (single handle) | Yes |
| Runs multiple outlets at once | Limited | Excellent |
| Typical price (valve + trim) | $120–$300 | $300–$700+ |
| Best for | Standard single-shower baths | Body sprays, rain + hand shower, luxury builds |
My rule of thumb: one showerhead and a normal budget? Pressure-balanced. A rain head plus a hand shower plus body jets — or a household where an exact temperature really matters — thermostatic earns its price.
What size and specs should I match — will it fit my shower?
Match three things and you’ll almost never go wrong: 1/2-inch inlet connections (the near-universal residential standard), your pipe type (copper sweat, PEX crimp, or threaded NPT), and the number of outlets you need. Most North American shower combos use 1/2-inch NPT or sweat connections, and standard flow tops out at 2.5 GPM under federal rules (1.8 GPM in California, Colorado, and a few other states).
Two quick specs to confirm before you buy:
- Wall thickness range: the valve lists a minimum-to-maximum finished-wall depth (often ~1.5″ to 2.5″). Thick stone or double-tile can push you past it — that’s when an extension kit saves the day.
- Outlet count: a single-outlet valve feeds only the showerhead. A tub-and-shower needs a valve with a spout outlet and an integrated or in-handle diverter. A multi-function shower needs a valve rated for two or more outlets, usually thermostatic.
If you’re replacing an existing tub-and-shower and want to reuse or upgrade the spout, don’t overthink the sealing step — thread tape vs. sealant is a common sticking point, and our breakdown of what to use for tub spout installation tells you exactly which to use for slip-on vs. threaded spouts.
How much should a good shower faucet combo with valve cost in 2026?
Expect $120–$300 for a quality pressure-balanced combo and $300–$700+ for thermostatic or multi-outlet systems. Below about $90, you’re usually looking at zinc-alloy internals and thin plating that pit within a couple of years; above $700, you’re paying for premium finishes, brass everywhere, and designer styling more than better function.
What actually drives the price — and what’s worth paying for:
- Valve body material: solid brass or lead-free DZR brass lasts decades; zinc alloy is where cheap combos cut cost. Worth paying for.
- Cartridge quality: ceramic-disc cartridges outlast rubber-seat designs and are the #1 reason a shower drips. Worth paying for.
- Finish durability: PVD-coated finishes (brushed nickel, matte black, brushed gold) resist scratching and hard-water etching far better than electroplate. Worth it in hard-water homes.
- Extra outlets & thermostatic control: genuinely nice, but only pay if you’ll use them.
One finish note for hard-water regions: matte black and brushed gold hide water spotting better than polished chrome, but they still need gentle care. If you already fight mineral buildup, keep our guide on removing hard water stains from a shower faucet without damaging the finish bookmarked — the wrong cleaner strips PVD coatings fast.
Can I install a shower faucet combo with valve myself?
You can install the trim yourself easily; installing the valve body is a real plumbing job that means opening the wall and joining supply lines, so weigh your comfort level honestly. If the wall is already open and you can sweat copper or crimp PEX confidently, a handy DIYer can do it in an afternoon. If you’d be soldering near finished tile or aren’t sure about local code, hire a plumber for the rough-in and do the trim yourself later.
The high-level sequence looks like this:
- Shut off the water and confirm zero pressure at the lines.
- Mount the valve body at the correct depth for your finished wall, keeping it plumb and level.
- Connect hot to the left inlet, cold to the right, and the outlet(s) up to the head (and down to the spout, if applicable).
- Install the plaster guard, pressure-test, then tile.
- Remove the guard, install the cartridge, escutcheon, handle, showerhead, and spout.
- Restore water, run hot and cold, and check for leaks at every joint.
Leaks after install almost always trace back to a joint or an over-/under-tightened connection, not the valve itself. If you spot a drip once everything’s live, our walkthrough on how to fix a leak on a faucet yourself helps you isolate the source before you blame the hardware.
Why buy a VIGA shower faucet combo with valve?
VIGA builds shower faucet combos around lead-free brass valve bodies and ceramic-disc cartridges, with pressure-balanced and thermostatic options that ship as complete, matched kits — valve, trim, and outlets in one box, so the compatibility guesswork is gone. Finishes are PVD-coated for scratch and corrosion resistance, and every combo is designed to standard 1/2-inch connections so it drops into typical North American rough-ins.
As a manufacturer focused specifically on faucets and bathroom fixtures — not a general home brand — VIGA tests valves to industry pressure and cycle standards and backs the cartridge and finish with a warranty, so a combo you install today is serviceable years down the road with off-the-shelf replacement cartridges. That “serviceable in five years” part is what separates a real fixture brand from a throwaway one.
FAQ
Is a shower faucet combo with valve cheaper than buying the parts separately?
Usually, yes. A bundled combo typically costs 10–25% less than sourcing a valve, trim, and showerhead individually, and it removes the risk of buying a trim that won’t fit your valve. The only time separate parts make sense is when you already have a good, compatible in-wall valve and just want new trim.
Will any trim fit my existing shower valve?
No. Trim is matched to a specific valve family, usually from the same brand. Even within one manufacturer, older valves may not accept current trim. Before buying trim-only, identify your valve’s exact model — or buy a full combo to guarantee the fit.
Pressure-balanced or thermostatic — which is safer?
Both meet anti-scald requirements, so both are safe. Thermostatic holds a more exact temperature and lets you adjust flow without changing temperature, which is nice for households with kids or elderly users. For a single standard shower, a pressure-balanced combo is safe and more affordable.
What size valve do most home showers use?
1/2-inch inlet connections are the residential standard across North America, in either NPT (threaded), sweat (copper), or PEX. Check the valve’s listed minimum and maximum finished-wall depth, too — thick tile or stone can require a valve extension.
How long does a shower faucet combo with valve last?
A brass-body combo with a ceramic cartridge commonly lasts 15–20+ years, with the cartridge being the main wear part you might replace once or twice along the way. Cheap zinc-alloy valves and rubber-seat cartridges fail far sooner, which is why the valve material and cartridge type matter more than the finish.
Can I convert a shower-only combo to a tub-and-shower later?
Only if the valve body has a spout outlet and diverter capability. A single-outlet shower valve can’t feed a tub spout, so if there’s any chance you’ll add a tub later, buy a tub-and-shower-rated valve now — swapping the valve body means reopening the wall.
Author note: This guide was written by VIGA’s fixtures content team, drawing on hands-on installation and product-testing experience with shower valves and trim across pressure-balanced and thermostatic systems. We write only about faucets and bathroom fixtures, and we update our buying advice as plumbing codes and flow-rate standards change.
WeChat
Scan the QR Code with WeChat