 English
 Deutsch
 Français
 Italiano
 Español
 Português
 Nederlands
 Polski
 Русский
 日本語
日本語 한국어
한국어 العربية
 China Faucet Factory & OEM/ODM Faucet Manufacturer
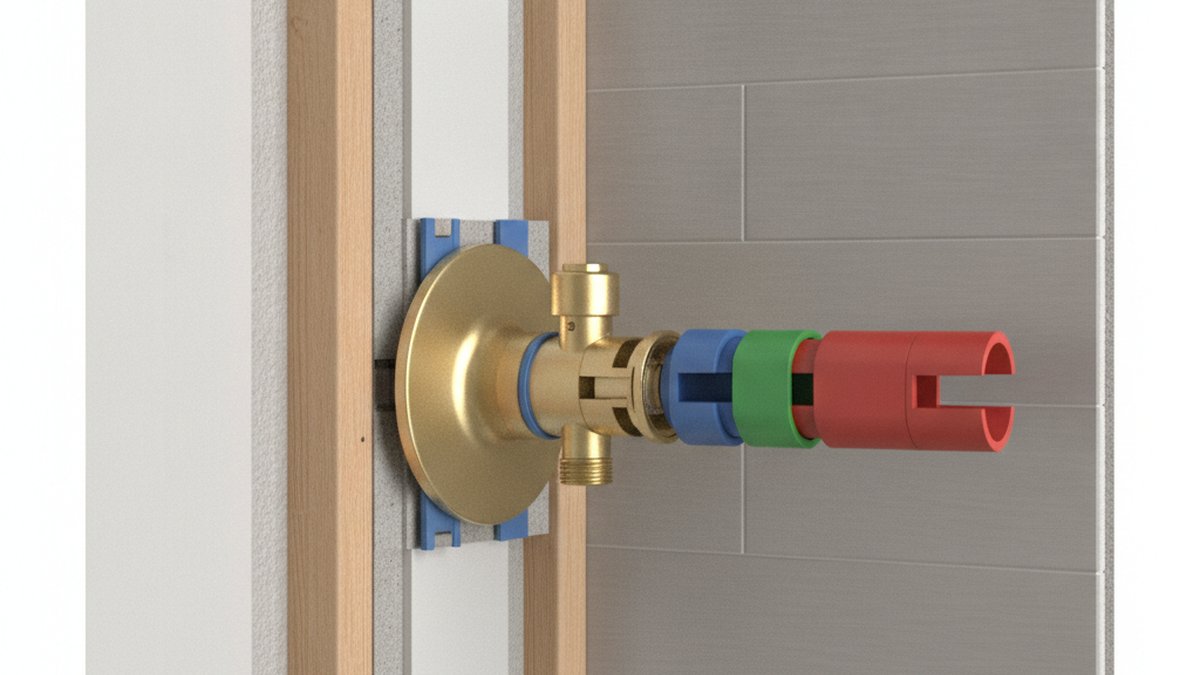
If you’ve tiled over an existing shower, added a thicker wall panel, or moved the finished wall surface outward, you’ve probably discovered your Moen valve now sits too deep in the wall. Learning how to install a Moen shower valve extension is the fix: an extension kit lengthens the cartridge stem and the trim mounting so the handle, escutcheon, and trim plate reach the new wall face without you tearing out plumbing. It’s one of the most DIY-friendly repairs in a bathroom, and you rarely need a plumber for it.
Below, we’ll walk through exactly what an extension kit does, which Moen kit matches your valve, the step-by-step install, and the mistakes that cause leaks. This is written for real bathrooms — remodels where the tile added 1/2 inch, or setups where the previous installer set the valve too far back.
What Exactly Is a Moen Shower Valve Extension, and Why Would You Need One?
A Moen shower valve extension is a kit of adapter parts that lengthens the reach of an in-wall valve so its trim can mount flush on a wall that’s now thicker than the valve was originally set for. It doesn’t move the plumbing — it extends the stem the handle attaches to and the mounting depth the escutcheon screws into.
You need one in a few very common situations:
- You tiled over drywall or old tile. Adding 1/4″–3/4″ of tile, backer board, or a shower panel pushes the finished wall past the valve, leaving the handle recessed in a hole.
- The valve was set too deep originally. Moen valves have a “plaster ground” mark showing the maximum finished wall depth. If a builder buried it past that line, the trim won’t seat.
- You’re upgrading trim. A new handle or escutcheon sometimes needs a touch more stem length to clamp properly.
The telltale sign: your handle screw won’t bite, the escutcheon plate floats off the wall, or you can see into the wall cavity around the valve. All three mean the trim can’t reach — an extension bridges that gap.
Which Moen Shower Valve Extension Kit Do I Actually Need?
Match the kit to your valve family — Moen makes a specific extension for each. The two you’ll meet most are the Posi-Temp (single-handle pressure-balancing shower valve) and the M-PACT / 1222 & 1225 cartridge systems. Using the wrong kit is the #1 reason an extension “doesn’t fit.”
Here’s how to identify your valve before you buy anything: pull the handle and look at the cartridge. A Posi-Temp cartridge (part 1222) is a stout single cartridge with a hexagonal stem. A 1225 is the smaller two-handle-era cartridge. The valve body is often stamped, and the trim’s model number (on the original box or Moen’s site) tells you the series.
| Valve / Cartridge | Common Extension Kit | Typical Extension Length | Best For |
|---|---|---|---|
| Posi-Temp (1222) | Moen Posi-Temp extension kit | ~1/2″ (≈13 mm) | Single-handle showers after re-tiling |
| Moentrol (3-function) | Moentrol extension kit | ~1/2″ | Volume + temperature control valves |
| 1225 cartridge | Stem extension + longer screws | 1/4″–1/2″ | Older single-handle setups |
| M-PACT common valve | M-PACT trim spacer/extension | Varies by trim | Mixing trim brands on Moen rough-in |
If you’re only short by 1/4″, check whether your existing trim came with a bit of adjustment before you buy a full kit. If you’re short by more than about 3/4″, a single extension often isn’t enough — that’s a sign the rough-in valve itself was set too deep and may need repositioning.
How Do You Install a Moen Shower Valve Extension Step by Step?
Installing a Moen shower valve extension takes about 30–60 minutes: shut off water, remove the old trim and handle, add the extension parts to the stem and valve, then remount the trim flush to the new wall. No torch, no sweating pipes. Here’s the full sequence.
Step 1 — Shut off the water and protect the drain
Turn off the water at the shower’s integral stops (if your valve has them — Posi-Temp valves usually do; use a flat screwdriver in the small screws behind the trim) or at the main. Open the shower to bleed pressure. Cover the drain with a rag or tape so nothing small disappears down it — losing a tiny retaining clip down the drain will end your afternoon.
Step 2 — Remove the handle and escutcheon
Pop the index cap off the handle, remove the handle screw (Phillips or a 3/32″ Allen depending on trim), and pull the handle straight off. Unscrew or unclip the escutcheon plate. Set everything on a towel in the order you removed it. Take a phone photo at each step — future you will thank present you.
Step 3 — (Posi-Temp) Remove the cartridge only if needed
Many Posi-Temp extension kits install without pulling the cartridge — the extension slides over the existing stem. If your kit requires cartridge removal, pull the horseshoe-shaped retaining clip with needle-nose pliers, then use a Moen cartridge puller to draw the cartridge straight out. Note its orientation (there’s a notch that must go back the same way, or hot/cold will reverse).
Step 4 — Install the stem extension
Slide the extension adapter over the cartridge stem. It should seat firmly and index onto the flats of the stem so the handle can still turn it. Hand-tight is right — do not force it. If the kit includes a valve-body extension sleeve, thread it onto the valve body; wrap the threads with 2–3 turns of plumber’s (PTFE) tape first for a clean seal.
Step 5 — Add the escutcheon/trim spacer
Fit the trim extension collar or spacer so the escutcheon will have something to screw into at the new depth. Dry-fit the escutcheon and handle now, before any sealant, to confirm the handle screw bites and the plate sits flush against the tile.
Step 6 — Seal, reassemble, and test
Run a thin bead of clear silicone around the top and sides of the escutcheon (leave the bottom open so any wall moisture can escape — a detail pros always follow). Reattach the handle, restore water, and run the shower for a few minutes. Check behind the trim for drips and confirm hot/cold are correct.
- Water off, pressure bled, drain covered.
- Handle + escutcheon removed and photographed.
- Cartridge left in place (or pulled per kit instructions).
- Stem extension seated on the flats, hand-tight.
- PTFE tape on any threaded sleeve.
- Escutcheon flush, silicone on top/sides only, then test.
What Tools and Materials Do I Need for This Job?
You need a small, common tool set — no specialty plumbing gear beyond one cartridge puller you may not even use. Here’s the realistic list for a Moen extension install:
- Phillips screwdriver and a hex/Allen key set (2.5 mm–4 mm covers most Moen trim)
- Needle-nose pliers (for the retaining clip)
- Moen cartridge puller — only if your kit requires cartridge removal
- PTFE plumber’s tape
- Clear or white silicone caulk + caulk gun
- A towel, a flashlight, and painter’s tape to protect the tile
Total spend on consumables is usually under $15 if you don’t already have silicone and tape. The extension kit itself typically runs $10–$30 depending on the valve family. Compared to a plumber’s minimum service call, this is one of the highest-value DIY repairs in the bathroom. If you’re comfortable swapping a tap aerator or a tub spout, you can absolutely handle this — the mechanical logic is the same, as we cover in our guide on what to use for tub spout installation.
Can You Extend a Shower Valve Without Opening the Wall?
Yes — that’s the entire point of an extension kit. In the vast majority of cases you extend a Moen shower valve entirely from the front, through the existing trim opening, without cutting drywall or tile. The extension works on the stem and trim side of the valve, all of which are accessible once the handle comes off.
You only need to open the wall in specific cases: the valve body itself is set more than about 3/4″–1″ too deep (past what any extension covers), the valve is damaged or leaking internally, or you’re relocating the shower controls. If you just re-tiled and the handle is now recessed, no wall work is needed. This is very different from a repair where water is escaping behind the wall — if you suspect that, read our walkthrough on how to fix a leak on a faucet yourself before assuming it’s just a depth issue.
What Are the Most Common Mistakes When Installing a Shower Valve Extension?
The most common mistakes are buying the wrong kit for your valve family, over-tightening the stem extension, and sealing the escutcheon completely around the bottom. Each one causes a predictable problem, and all three are avoidable.
| Mistake | What Happens | Fix |
|---|---|---|
| Wrong kit (Posi-Temp vs 1225) | Extension won’t index on the stem | Identify the cartridge first; match the kit |
| Over-tightening the stem adapter | Cracked adapter or stiff handle | Hand-tight only, seat on the flats |
| Silicone all the way around | Trapped moisture can’t drain | Leave the bottom edge open |
| Forgetting PTFE tape | Slow drip at threaded sleeve | 2–3 wraps on threads, clockwise |
| Reversed cartridge notch | Hot and cold are swapped | Match the original orientation notch |
One more real-world tip: dry-fit everything before you caulk. If the handle screw doesn’t reach after adding the extension, you either need a longer trim screw (often included) or you’ve extended too far. It’s a two-minute check that saves a full teardown.
Is a Moen Extension Worth It, or Should You Replace the Whole Valve?
An extension is almost always worth it when your existing Moen valve is sound and only the depth is wrong — it’s a $10–$30 part versus a multi-hundred-dollar valve replacement that involves opening the wall and re-plumbing. Replace the whole valve only if it’s leaking internally, cracked, or so deep no extension reaches.
Think of the extension as matching your valve to your new wall, not fixing a broken valve. If your Posi-Temp cartridge is old and sticky, that’s a separate, cheap cartridge swap you can do at the same time while the trim is off — bundle the two jobs. For a whole-fixture upgrade philosophy, the same logic we use when choosing a brushed nickel tap extender applies here: extend what works, replace only what’s failed.
A quick word on finishes and matching trim
When you remount trim after extending, it’s a natural moment to refresh the escutcheon and handle to match a remodel. Just confirm any new trim is compatible with your rough-in valve family. Mixing a third-party trim onto a Moen valve can work with the right spacer, but check fit first — the same care you’d take matching a new roman tub setup, as in our guide to Pfister Roman tub faucet installation.
FAQ
How much does a Moen shower valve extension kit cost?
Most Moen extension kits run $10–$30 depending on the valve family (Posi-Temp, Moentrol, or M-PACT). Consumables like PTFE tape and silicone add under $15 if you don’t already have them. It’s dramatically cheaper than replacing the valve or hiring a plumber.
How far can a Moen valve extension reach?
Standard Moen extensions add roughly 1/4″ to 1/2″ (about 6–13 mm) of depth. If your finished wall is more than about 3/4″ past the valve, a single extension usually isn’t enough, and you may need to reposition the valve body — which does require opening the wall.
Do I need to remove the cartridge to install the extension?
Often no. Many Posi-Temp extension kits slide over the existing stem without pulling the cartridge. Some kits and older 1225 setups do require removal — check your specific kit’s instructions. If you do pull it, note the orientation notch so hot and cold don’t reverse.
Can I use any brand’s extension on a Moen valve?
No — match the extension to your Moen valve family. Posi-Temp, Moentrol, and the 1222/1225 cartridges all use different stem shapes. A generic or wrong-series extension won’t index on the stem flats, so the handle won’t turn the valve properly.
Will an extension fix a leaking shower valve?
No. An extension only corrects mounting depth so the trim seats flush. If your valve drips or leaks behind the wall, that’s a cartridge or seal issue, not a depth issue — you’d replace the cartridge or the valve. Diagnose the leak first; extend second.
Is installing a shower valve extension safe to do myself?
Yes, for most DIYers. There’s no soldering, no gas, and no structural work — just shutting off water and swapping trim-side parts. If you can change a faucet aerator or a tub spout, you can do this. Turn off the water and bleed pressure first, and you’re working on a de-pressurized system.
About the author: This guide was written by VIGA’s fixture install team, who have hands-on experience fitting and troubleshooting pressure-balancing shower valves, cartridges, and trim across remodels and new builds. About VIGA: VIGA (www.vigafaucet.com) is a manufacturer and retailer of faucets, shower systems, and bathroom fixtures, focused on durable brass bodies and ceramic-disc cartridges. Our shower valves and trim are pressure-tested at the factory and built to align with ASME A112.18.1/CSA B125.1 fixture standards, and quality-tier products carry a limited lifetime warranty on finish and function — always follow your kit’s included instructions and local plumbing code, and confirm your valve is compatible before installing any extension.
WeChat
Scan the QR Code with WeChat