 English
 Deutsch
 Français
 Italiano
 Español
 Português
 Nederlands
 Polski
 Русский
 日本語
日本語 한국어
한국어 العربية
 China Faucet Factory & OEM/ODM Faucet Manufacturer
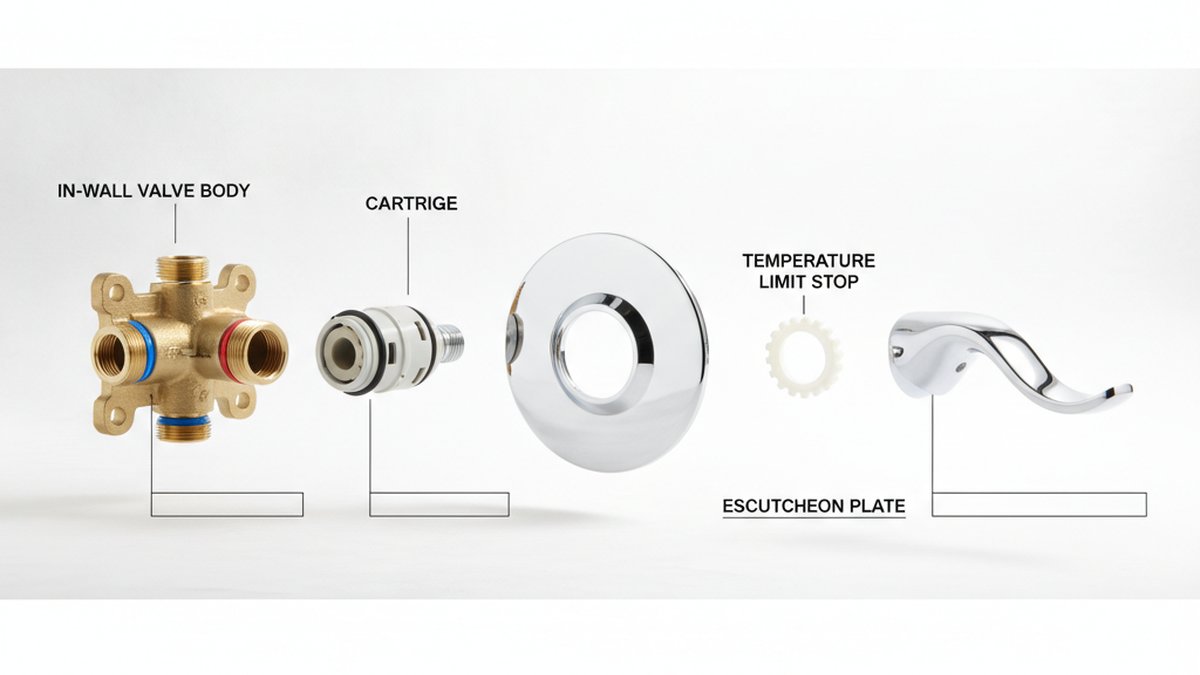
Learning how to replace shower valve trim is one of the highest-reward bathroom upgrades a homeowner can do: you get a brand-new-looking shower for a fraction of the cost of a full valve replacement, and in most cases you never open the wall or solder a single pipe. “Trim” is everything you actually see and touch — the handle, the round or square wall plate (the escutcheon), the temperature limit stop, and sometimes the shower arm flange. The valve body, the part buried in the wall that mixes hot and cold, stays put. This guide walks you through exactly how to do it, what will trip you up, and how to make sure the new trim actually fits before you buy it.
At VIGA we design shower trim and valve systems for both new installs and retrofits, so the advice below is the same thing our own product engineers tell customers on the phone when they’re standing in the bathroom with a screwdriver in hand.
What Exactly Is “Shower Valve Trim” and What Am I Actually Replacing?
Shower valve trim is the visible, decorative hardware that mounts on top of your in-wall shower valve — the handle, escutcheon (wall plate), sleeve, and screws. You are replacing the cosmetic layer only, not the valve body or the water lines. That distinction is the single most important thing to understand before you start, because it decides whether this is a 45-minute Saturday job or a wall-opening plumbing project.
Think of it like this: the valve body is the engine, and the trim is the dashboard and steering wheel. If your water pressure and temperature are fine and the only problem is that the finish is corroded, the handle is loose, or the style is dated, you almost certainly need trim — not a new valve. You’ll know you need the valve body itself only if the valve is leaking behind the wall, won’t shut off fully, or the cartridge is seized.
- Handle — the lever or knob you turn; the part that wears out cosmetically first.
- Escutcheon — the round or square plate that covers the hole in the tile.
- Sleeve / adapter — a spacer that lets the trim reach the valve stem at the right depth.
- Temperature limit stop — a small ring that caps how hot the water can go (a scald-safety feature required by modern code).
- Screws and set screw — the small hardware that locks it all in place.
Can I Put Any Trim Kit on My Existing Shower Valve?
No — and this is where most DIYers go wrong. Trim is not universal. A trim kit is engineered to fit one manufacturer’s valve family, so you generally must match the trim to the exact brand and series of the valve already in your wall (for example, a Moen Posi-Temp valve takes Moen Posi-Temp trim, a Delta 1400/1700 series valve takes Delta MultiChoice trim, and so on). Putting the wrong brand’s trim on a valve will either not seat at all or will leak and feel loose.
So before you buy anything, identify your valve. If you have the original paperwork or the valve is visible from an access panel, read the model number directly. If not, pull the existing handle and escutcheon off and look at the cartridge and the stub-out — the shape of the stem, the spline pattern, and any stamped logo tell you the brand. When in doubt, photograph the exposed valve and take it to the parts counter or send it to the manufacturer’s support line.
| Valve System | Common Trim Series | Retrofit-Friendly? | Typical Trim Cost |
|---|---|---|---|
| Moen Posi-Temp | Moen Posi-Temp trim | Yes — same-brand only | $40–$120 |
| Delta 1400/1700 series | Delta MultiChoice trim | Yes — very forgiving | $45–$150 |
| Kohler Rite-Temp | Kohler Rite-Temp trim | Yes — same-brand only | $50–$160 |
| Pfister 0X8 series | Pfister trim | Yes — same-brand only | $40–$110 |
| Universal / off-brand valve | May require full valve swap | Often no | Varies |
If your valve is an unbranded builder-grade unit and no matching trim exists, that’s the one scenario where you may need to replace the valve body too — which does mean opening the wall. If you’re weighing that route, it’s worth reading how a full shower faucet combo with valve works, since buying the valve and trim as a matched set removes all the guesswork.
What Tools and Parts Do I Need to Replace Shower Valve Trim?
You need very few tools — most people already own everything except the trim kit itself. Here’s the complete list so you’re not making a second trip to the hardware store mid-project.
- New trim kit matched to your valve brand and series.
- Allen/hex key set — most handle set screws are hex.
- Phillips and flat screwdrivers.
- Adjustable wrench or channel-lock pliers.
- Plumber’s silicone caulk (100% silicone, not latex) to seal the escutcheon against the tile.
- A rag and white vinegar for cleaning mineral scale off the stub-out.
- Painter’s tape to protect the tile finish while you work.
One optional but smart addition: a small tube of plumber’s grease for the cartridge stem and O-rings. If your handle has felt stiff, a dab of silicone grease during reassembly makes it turn like new. And if your stub-out (the pipe protruding from the wall) sits too deep for the new escutcheon to reach the tile, you’ll need an extension — the same principle covered in our guide on how to install a Moen shower valve extension.
How Do You Replace Shower Valve Trim Step by Step?
Replacing shower valve trim takes about 30 to 60 minutes and breaks down into six clear steps: shut off water, remove the old handle, remove the old escutcheon, prep the valve, install the new trim, and test. Follow them in order and don’t force anything — trim is designed to slide and click, not to be hammered.
Step 1 — Turn off the water and cover the drain
Shut off the water to the shower. Many valves have integral stops you can close with a flat screwdriver right at the valve; if not, close your home’s main supply. Then open the shower handle briefly to release residual pressure, and lay a towel over the drain so you never lose a set screw down the pipe. This single step prevents 90% of the frustration in this job.
Step 2 — Remove the old handle
Find the set screw. On a lever handle it’s usually hidden under the handle or behind a small snap-in button/logo cap that you pop off with a fingernail or flat blade. Loosen the set screw with your hex key — you rarely need to remove it fully — and pull the handle straight off the stem. If it’s stuck from mineral buildup, wiggle gently; don’t pry against the tile.
Step 3 — Remove the old escutcheon
The wall plate is held by either screws behind the handle, a threaded collar, or a bead of old caulk. Back out any screws, then slice the caulk seal with a utility knife and ease the plate off. Behind it you’ll see the valve body, the cartridge stem, and the plaster guard. Take a photo now — it’s your reference for reassembly.
Step 4 — Clean and prep the valve
Wipe the stub-out and cartridge with a vinegar-dampened rag to remove scale. Do NOT pull the cartridge out unless you’re also replacing it — for a trim-only swap the cartridge stays. Check that the temperature limit stop is present and set; you’ll re-establish the max-hot setting when the new handle goes on. Hard-water buildup is a common reason old trim looked bad in the first place, and our guide on how to remove hard water stains from a shower faucet covers keeping the new finish spotless.
Step 5 — Install the new trim
Slide the new sleeve/adapter over the cartridge stem, then mount the new escutcheon. Before you seal it, run a bead of 100% silicone around the top and sides of the escutcheon (leave the bottom open so any water that gets behind can escape and you can spot a leak). Attach the new handle, set the temperature limit stop to a safe max (test that fully-hot doesn’t exceed ~120°F / 49°C), and tighten the set screw snug — not gorilla-tight.
Step 6 — Restore water and test
Reopen the water stops or main. Run the shower through its full range: hot, cold, and back. Watch the escutcheon edge and the handle base for any drips. Feel that the handle moves smoothly and stops where it should. If everything’s dry and smooth, you’re done.
How Long Does It Take, and What Does It Cost vs. a Plumber?
A trim-only replacement costs roughly $40–$160 in parts and 30–60 minutes of your time if you DIY. A plumber doing the same swap typically charges $150–$350 in labor on top of the parts, mostly because it’s a quick call-out with a minimum service fee. So doing it yourself usually saves $150–$300.
The math changes only if you discover the valve body itself is bad. Replacing a valve behind a tiled wall can run $400–$800+ with a pro because it involves opening and repairing the wall. That’s exactly why identifying trim-vs-valve up front matters so much — a $60 trim job and a $600 valve job start the same way but end very differently.
| Scenario | DIY Cost | Pro Cost | Time (DIY) |
|---|---|---|---|
| Trim only (matched valve) | $40–$160 | $200–$450 total | 30–60 min |
| Trim + cartridge | $70–$220 | $300–$550 total | 1–1.5 hrs |
| Full valve body swap | $120–$300 | $400–$800+ | 3–5 hrs / wall work |
What Are the Most Common Mistakes When Replacing Shower Valve Trim?
The biggest mistake is buying trim that doesn’t match the valve — followed closely by over-tightening the set screw and forgetting to reset the temperature limit stop. Each of these is avoidable once you know to watch for it.
- Mismatched brand/series. Confirm the valve first, buy the trim second. Never the reverse.
- Sealing the bottom of the escutcheon. Leaving the bottom edge un-caulked gives trapped water an escape path and lets you catch a hidden leak early.
- Skipping the temperature limit stop. A new handle resets the range; if you don’t set the limit, the shower can run scalding hot.
- Forcing a stuck handle. Dissolve mineral buildup with vinegar instead of prying against the tile, which cracks it.
- Using latex caulk. Only 100% silicone holds up to constant moisture without mildewing and peeling.
If, after everything, you still see water weeping from the handle or plate, the culprit is usually the cartridge or an O-ring rather than the trim itself — the same diagnostic logic we walk through in our general guide on how to fix a leak on a faucet yourself.
FAQ
Do I need to turn off the main water to replace shower valve trim?
Not always. Many modern valves have integral stops you can close right at the valve with a flat screwdriver, isolating just that shower. If yours doesn’t have them — or you’re not sure — close the home’s main supply. Either way, always release pressure by opening the handle before you start.
How do I know if I need new trim or a whole new valve?
If the problem is cosmetic — dated finish, loose or corroded handle, cracked escutcheon — you need trim. If the valve leaks behind the wall, won’t fully shut off, or the temperature won’t regulate, that’s the valve body or cartridge. Pull the handle and inspect: a healthy cartridge with a shabby handle means trim only.
Can I switch brands, like put Delta trim on a Moen valve?
No. Trim is engineered to a specific valve’s stem shape, spline count, and depth, so you must stay within the same manufacturer’s compatible series. Mixing brands results in trim that won’t seat, wobbles, or leaks. If you want a different brand’s look, you’d need to replace the valve body to match.
Will replacing the trim fix a dripping shower?
Usually not on its own. A drip from the showerhead when the valve is off is almost always a worn cartridge, not the trim. Since you’re already in there, many people replace the cartridge at the same time as the trim — it’s cheap, fast, and solves the drip while the wall is open.
What finish should I choose for new shower trim?
Match your other bathroom fixtures for a cohesive look — brushed nickel and matte black hide water spots best, while chrome and polished finishes show them fastest in hard-water areas. Whatever you pick, look for a trim kit with a PVD (physical vapor deposition) coating, which resists scratching and tarnish far better than standard electroplating.
How do I reset the temperature so the water isn’t scalding?
After the new handle is on, most valves let you set a rotational limit stop that caps the maximum hot position. Run the water fully hot, check it stays at or below about 120°F (49°C), and adjust the stop ring one notch cooler if needed. This scald-guard step is required by modern plumbing code for a reason — don’t skip it.
A Note on Standards, Warranty, and Who Wrote This
Quality shower valves and trim sold in the U.S. are tested against ASME A112.18.1/CSA B125.1 for mechanical performance and ASSE 1016 for pressure-balancing and scald protection. When you buy a matched valve-and-trim set, keep the model numbers and receipt — most reputable manufacturers, VIGA included, back trim finishes and mechanical parts with multi-year to limited-lifetime warranties, but only when the trim is installed on a compatible valve.
About the author: This guide was written by VIGA’s fixtures content team and reviewed against our own product installation manuals. VIGA has manufactured faucets, shower systems, and bathroom fixtures for the global market for over two decades, supplying both retail buyers and professional installers. Our recommendations reflect real bench testing and the same troubleshooting our support engineers use with customers every day. For finish care, sealing, and threaded-connection questions that come up during installs, our guide on what to use for tub spout installation — sealant, thread tape, or nothing is a useful companion read.
Bottom line: replacing shower valve trim is one of the most beginner-friendly plumbing upgrades there is. Match the trim to your valve, take your time on the two removal steps, seal the escutcheon correctly, and reset the temperature limit — and you’ll have a shower that looks and works like new in under an hour, for well under a hundred dollars.
WeChat
Scan the QR Code with WeChat