 English
 Deutsch
 Français
 Italiano
 Español
 Português
 Nederlands
 Polski
 Русский
 日本語
日本語 한국어
한국어 العربية
 China Faucet Factory & OEM/ODM Faucet Manufacturer
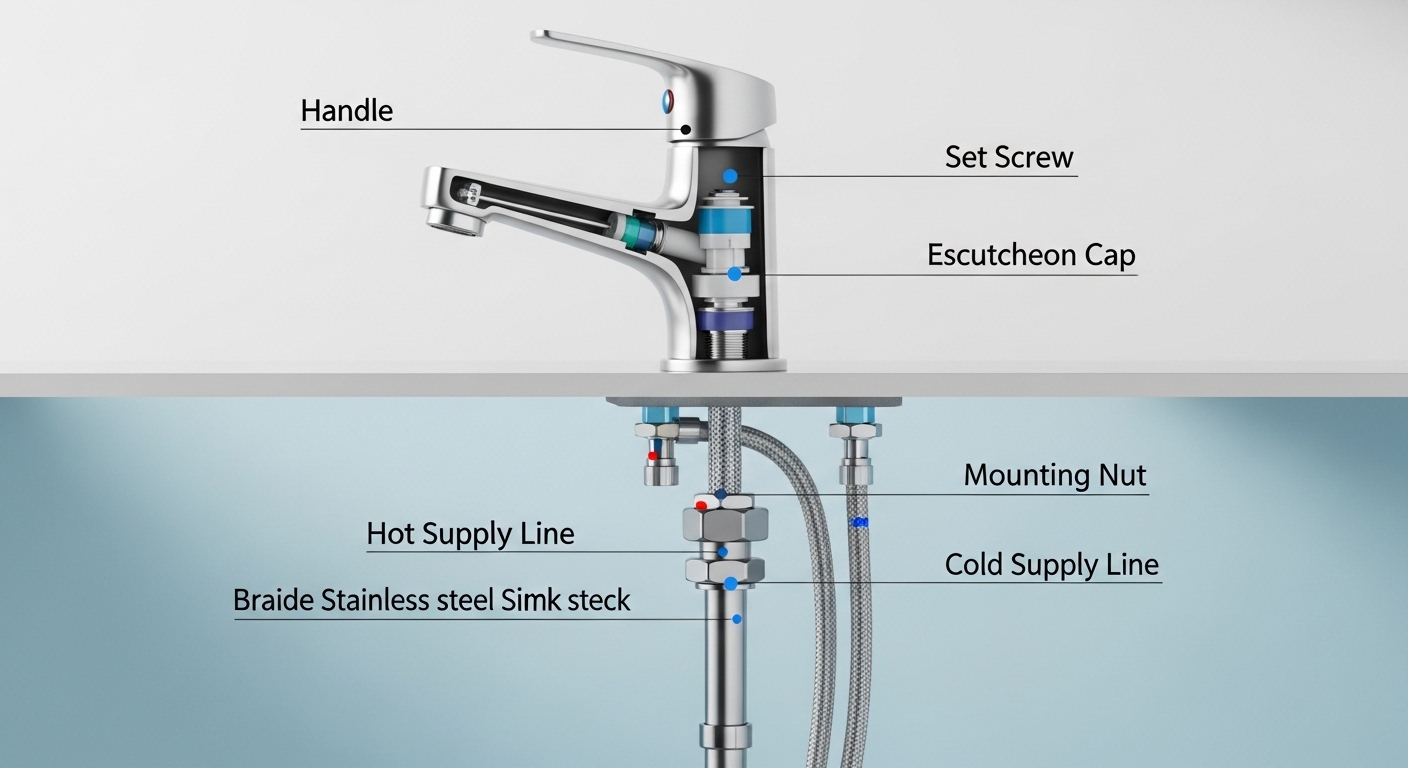
A single handle faucet removal is one of the most beginner-friendly plumbing jobs in your house, because there’s only one handle, one cartridge, and usually two supply lines to deal with — far simpler than a two-handle widespread setup. If you can turn a wrench and you’re patient with rusted hardware, you almost never need to pay a plumber $150–$250 to swap one out. The whole job comes down to four moves: kill the water, disconnect the lines, free the mounting nut, and lift. Below I’ll walk you through exactly how to do it, what tools actually matter, and the two or three things that cause 90% of the headaches.
I’ve pulled and replaced dozens of single-lever faucets across kitchen and bathroom decks — old Moens seized to the granite, builder-grade specials with plastic nuts, and heavy solid-brass units. The mechanics are nearly identical every time once you know where the fasteners hide.
What tools do you actually need for a single handle faucet removal?
You need five things, and only one of them is specialized: a basin wrench. Everything else is probably already in a kitchen drawer. The basin wrench is what lets you reach the mounting nut up behind the sink basin where your hand and a normal wrench can’t fit — skip it and you’ll fight the job for an hour.
Here’s the realistic kit:
- Basin wrench (~$15–$20) — the swiveling-jaw wrench that reaches up behind the basin. Non-negotiable for the mounting nut and the supply-line nuts.
- Adjustable wrench or channel-lock pliers — for the supply line connections you can reach.
- Allen/hex key set — single-lever handles are almost always held by a hidden hex set screw.
- Flathead screwdriver — to pop the decorative index cap (the little red/blue or logo button) that hides the set screw.
- Bucket, towels, and a flashlight or headlamp — there’s always residual water, and the cabinet under a sink is dark.
Optional but smart: penetrating oil (PB B’laster or similar) for corroded nuts, and a pair of safety glasses, because you spend this whole job lying on your back looking straight up at falling grime.
How do you turn off the water before removing a single handle faucet?
Look directly under the sink for two small oval or round shut-off valves on the supply lines — turn both fully clockwise until they stop. One feeds hot, one feeds cold. Closing them isolates the faucet so you can disconnect everything without water spraying across the cabinet.
Then — and people skip this — open the faucet handle to the full-on position. This does two things: it confirms the shut-offs actually worked (no water = good), and it relieves the pressure trapped in the lines so you don’t get a surprise spray when you crack the first nut. Leave the handle open while you work.
If your under-sink shut-offs are old, frozen, or simply don’t exist (common in homes built before the 1990s), go to your home’s main water shut-off and close that instead. After you’ve turned the main off, open a faucet on a lower floor to drain the standing water in the pipes. A quick warning sign: if a quarter-turn valve won’t budge or weeps when you turn it, that valve itself may need replacing — that’s a separate small job, and it’s worth doing while everything’s already apart.
Where is the hidden screw on a single handle faucet?
On nearly every single-lever faucet, the handle is held by one small hex (Allen) set screw, and it’s hidden under a snap-on decorative cap. Look for a small plastic or metal button on the front or back of the handle base — often the brand logo, or a red/blue hot-cold indicator. Pry it off gently with a flathead and the set screw is right underneath.
This single detail is the number-one reason DIYers get stuck. They tug and twist the handle, assume it’s “glued on,” and give up — when really there’s just a 2.5mm or 3mm hex screw they never saw. Loosen that set screw (you usually don’t need to remove it fully), and the handle lifts straight up and off.
A few brand-specific notes worth knowing before you start, because the cap and screw style varies:
| Faucet type / brand style | Where the screw hides | Tool to release the handle |
|---|---|---|
| Moen single-handle (kitchen) | Hex set screw under a button cap at the base, or under the handle | Hex key (often 7/64″ or 3/32″) |
| Delta single-lever | Set screw under the decorative cap on the handle dome | Hex key (commonly 1/8″) |
| Generic / builder-grade lever | Set screw behind the lever or under a front index cap | Hex key (2.5–3mm) |
| Ceramic-disc cartridge models (incl. Viga) | Set screw under a snap cap; cartridge held by a brass retaining nut | Hex key + adjustable wrench for the nut |
If your goal is to remove just the cartridge — say, to stop a drip — rather than the whole faucet body, stop after you pull the handle: under it you’ll find a retaining clip or brass nut holding the cartridge, and you can pull the cartridge straight out. For repairs at the valve level, our guide on how to change a kitchen tap valve walks through that exact step in detail.
What are the actual step-by-step instructions to remove a single handle faucet?
Here’s the full sequence from start to finish. The whole single handle faucet removal takes most people 30 to 60 minutes the first time, faster once you’ve done one.
- Shut off both supply valves under the sink (clockwise), then open the faucet handle to release pressure and confirm the water’s off.
- Disconnect the supply lines. Place your bucket and towel underneath, then use the basin wrench or adjustable wrench to loosen the nuts connecting the flexible supply lines to the faucet tailpieces. Expect a little trapped water — that’s what the towel is for.
- Disconnect the sprayer or pull-down hose if you have one. On a pull-down kitchen faucet, there’s a quick-connect or a weighted hose — unclip the weight and release the connector.
- Pop the index cap and loosen the handle set screw with your hex key, then lift the handle off.
- Remove the escutcheon / decorative collar. Many single-lever faucets have a chrome dome or base plate that either unscrews by hand or lifts off once the handle’s gone.
- Locate and loosen the mounting nut(s) under the deck. Reach up with the basin wrench and turn counter-clockwise. This is usually the hardest single step — see the corrosion section below.
- Lift the faucet out from the top. Once the mounting nut is off, the faucet body lifts straight up out of the deck holes. If it resists, it’s just old plumber’s putty or silicone sealing it to the deck — work a putty knife under the base to break the seal.
- Clean the deck. Scrape off the old putty, silicone, and mineral crust so your new faucet seats on a clean, flat surface.
That’s it. If you’re installing a new faucet immediately, this is also the perfect moment to inspect and replace the supply lines and shut-off valves while access is wide open — they’re cheap insurance against a future leak.
What if the mounting nut is rusted or won’t budge?
Spray the corroded nut with penetrating oil, wait 10–15 minutes, and try again — and if it still won’t move, switch to a hacksaw blade or rotary tool as a last resort. A seized mounting nut is the single most common reason a “30-minute job” turns into an afternoon, especially on faucets older than 10–15 years where hard water and rust have welded the threads.
Work through it in this order:
- Penetrating oil + patience. Soak it, walk away for 15 minutes, soak again. Most nuts free up on the second try.
- Better leverage. A telescoping basin wrench or a long-handled wrench multiplies your force in that cramped space.
- Heat (carefully). A little heat from a hair dryer expands the metal and can break the corrosion bond — keep open flames away from supply lines and the cabinet.
- Cut it off. If it’s a plastic nut that’s cracked or a brass nut that’s truly seized, cut through it with a mini-hacksaw blade or an oscillating tool. Wear eye protection and go slow so you don’t gouge the sink.
Hard water is the usual villain behind seized hardware and scaled-up faucets in general. If you’re battling mineral buildup throughout your fixtures, it’s worth tackling the root cause — our walkthrough on cleaning a faucet head with vinegar and baking soda covers the descaling approach that keeps threads and aerators from cementing themselves shut in the first place.
Do you need to replace anything else while the faucet is off?
Yes — three things are worth replacing while you have access, because they’re cheap, they’re the usual failure points, and you’ll never have a better view of them. Replace the supply lines, the shut-off valves if they’re old or stiff, and the aerator or diverter on the new faucet if applicable.
Braided stainless supply lines run a few dollars each and are far more reliable than the old chrome-plated or rubber ones; if yours are more than a decade old, swap them. Stiff or weeping quarter-turn shut-off valves are a leak waiting to happen — replacing a pair is a 20-minute add-on now versus an emergency later. And if your faucet feeds a sprayer or a secondary outlet, this is the moment to check the diverter; if you’re not sure what that part even does, our explainer on the kitchen faucet diverter clears it up. Households with a second prep basin often upgrade at the same time — see whether a prep sink pull-down faucet makes sense before you commit to a like-for-like replacement.
Single handle vs. two-handle removal: which is actually easier?
Single handle is meaningfully easier — fewer parts, fewer connections, and one cartridge instead of two stems. Here’s the honest comparison so you know what you’re dealing with before you start.
| Factor | Single handle faucet | Two-handle / widespread faucet |
|---|---|---|
| Mounting points to free | Usually 1 nut (single deck hole) | 2–3 nuts across multiple holes |
| Supply connections | 2 lines | 2 lines + center spout connections |
| Hidden fasteners | 1 handle set screw | 2 handle set screws + caps |
| Typical DIY time | 30–60 min | 45–90 min |
| Beginner difficulty | Low | Low–moderate |
If you’re choosing a replacement, single-lever faucets are also easier to install and to live with — one-hand temperature control, fewer seals to fail, and a cleaner look on a modern deck. That simplicity is exactly why they dominate new kitchen and bath installs.
FAQ
How long does a single handle faucet removal take?
For a first-timer with the right tools, plan on 30 to 60 minutes. The variable is corrosion — if the mounting nut is seized, add 15–30 minutes for penetrating oil to work or for cutting it off. Someone who’s done it before can pull a clean, non-corroded faucet in about 15 minutes.
Do I have to turn off the main water to remove a single handle faucet?
No, not if you have working shut-off valves under the sink — just close those two. Only go to the main water shut-off if the under-sink valves are missing, frozen, or leaking. Either way, open the faucet afterward to relieve line pressure before disconnecting anything.
Why won’t my single handle faucet lift out after I removed the nut?
It’s almost always old plumber’s putty or silicone sealing the base to the deck. Slide a putty knife or thin flathead under the faucet base and gently work around the perimeter to break the seal, then lift again. Make sure you’ve also disconnected any sprayer hose or quick-connect that could still be tethering it.
Can I remove just the cartridge instead of the whole faucet?
Yes. If you only need to fix a drip or stiff handle, stop after pulling the handle: remove the retaining clip or brass nut underneath and pull the cartridge straight out. You don’t need to disconnect the supply lines or touch the mounting nut for a cartridge swap — just be sure the water is off first.
What size Allen wrench removes a single handle faucet?
Most single-lever handle set screws take a small hex key in the 2.5mm–3mm range (often 7/64″ or 1/8″ on Moen and Delta). A standard hex key set covers every common size. The screw sits under a snap-off index cap on the handle, so pop that cap first.
Should I replace the supply lines when I remove the faucet?
If they’re braided stainless and only a few years old, you can reuse them. But if they’re old chrome, rubber, or more than about ten years old, replace them — new braided lines cost a few dollars and prevent a future under-sink flood. With the faucet out, it’s the easiest access you’ll ever have.
A note on standards, testing, and who wrote this
When you replace a single-handle faucet, choose one that meets the plumbing standards that actually matter for safety and longevity: look for compliance with NSF/ANSI 61 and NSF/ANSI 372 (lead-free wetted surfaces) and a ceramic-disc cartridge rated for 500,000+ open/close cycles. At Viga, every faucet body is pressure-tested and salt-spray tested for finish durability before it ships, and our single-lever kitchen and bath faucets are backed by a multi-year limited warranty on the cartridge and finish — the two parts most likely to show wear over a decade of daily use.
Author note: This guide was written by the Viga Faucet product and technical team, drawing on hands-on installation and removal of single-handle kitchen and bathroom faucets across dozens of finish and cartridge types. Viga is a manufacturer of faucets and bathroom fixtures, and we publish these guides to help homeowners do simple jobs themselves and choose the right replacement when it’s time. As always, if you hit a shut-off valve that won’t close or a leak you can’t isolate, call a licensed plumber — knowing when to stop is part of doing it right.
WeChat
Scan the QR Code with WeChat